Using Keynote 8 to present about my clinical experiences using Virtual Reality at Cedars-Sinai – how I managed unexpected glitches and “tech support”

In late March, 2018, I was in Los Angeles presenting at the inaugural Virtual Medicine conference at Cedars-Sinai. Here’s the website and screenshot:

virtual medicine C-S

I had been invited over by faculty head Dr. Brennan Spiegel to present, TED-style, on my 17 years working clinically with Virtual Reality.

The timing of the conference was excellent and the day it finished Steven Spielberg’s new film, Real Player One, which features VR, was set to open. Indeed, my hotel, the Sofitel, featuring a huge poster on its wall.

IMG_6285

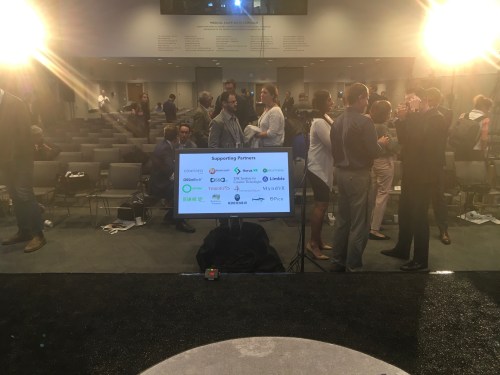
Some 300 people attended in person while another 1000 viewed the live stream via 360 degree Samsung technology, so it could be viewed in a head mounted display. The stage was equipped with a large vanity screen which mirrored the very large projection screen behind and above the presenters. Below, you can see a picture of the setup which I took during a break, below. The control booth for the presentations can be seen at the very top of the picture, centre.

IMG_8086


For my presentation, I was given 25 minutes very early in the two day conference, and prior had been asked to hand in my slidestack to be uploaded to a central server.

I never do that, given I present using Apple’s Keynote on a MacBook Pro and it contains a number of unusual fonts.

So I and a number of other speakers made arrangements with the technical support staff to use our MacBooks on stage, but not stand behind a podium. This required some form of remote control so we could wander the stage.

The videos of all the speakers will be uploaded soon, I’m told, but in the meantime, there are some lessons to be learnt which I want to pass on.

When tech support becomes a hindrance

While most other speakers used a clicker device to advance slides (and unfortunately also use the built-in laser light to highlight live slide elements), I elected to use my iPad to both control the slides, and as a mirror for my MacBook which was placed in presenter mode, meaning it displayed on the left the current slide the audience could see, and on the right was the next build. You can see an image, below:

Screen Shot 2018-04-05 at 5.37.03 pm (2).png

The next build can refer to the same slide but the next action which takes place, or it could mean the next slide. Some presentation mavens speak about the maximum number of slides a presentation should contain. This is really 1980s uninformed thinking. I could have one slide but with 200 builds which could take twenty minutes to present, or 200 individual slides with no builds, just transitions between slides. Be wary of anyone who offers you unbending rules about presentations.

If you’re unfamiliar with presenter mode (most presenters I meet, whether using Keynote or Powerpoint don’t use presenter mode), you can see this mode in action, illustrated above, using the latest Keynote 8. On the left is the image the audience sees, and on the right is the next build the audience will see when the slideshow is advanced. It also shows the number of builds on the same slide still to come. In the image, above, the right “preview” screen it states Builds Remaining: 3. You can also see two other handy images: the current time on the left, and the elapsed time on the right. It commences when you hit Keynote’s Play button.

In previous versions of Keynote, builds remaining was represented by blue dots not numbers, displayed under the current screen (as shown in this screen shot of Keynote 5, below). Why don’t more people use presenter mode? Presenting at conferences using the venue equipment almost always prohibits its use.

Screen Shot 2018-04-05 at 5.42.47 pm.png

Note, too, the use of Post it Notes graphics placed on the two slides. This was a great feature of Keynote up to version 5. It allowed you to remind yourself of the content of the screen when it was black. It’s like the presenter’s notes Keynote still maintains at the bottom of the screen, which I NEVER use. It takes up too much screen real estate, and it encourages you to read the slides. My guidance is that anything written in the presenter’s notes area (hidden from the audience) should really be on the slide itself. The Post It style note – which also is invisible to the audience – used to help me remember there was a movie or object under the black screen. I wanted to control when the audience would see the movie begin, often with a slow fade in, rather than its initial image. When Keynote on the desktop aimed for parity with iOS versions starting in Keynote 6, these Post It Notes were dropped in favour of yellow Comments notes to encourage collaboration with other Keynote users. They would not appear during the live presentation so couldn’t function as slide reminders.

The Post It notes feature was also useful if objects are to enter the screen from the sides and I want a cue to remind me of the blank slide’s content. In the screen movie below, I wanted to illustrate an experiment where objects movie across the screen, entering stage left and right, where the subject’s task is to say which one is in front and which one is behind (a test of depth perception). The objects need to move in off screen, but Keynote 8 can’t show in presenter mode they are “waiting in the wings” to make their entry. This is where the Post it Note feature could still be handy. To overcome this in Keynote 8, one could put the reminder in the presenter’s notes, but that area is then taken up for the entire show, not just the slide in question. You would have to be at the MacBook to hit the correct keyboard sequence (SHIFT+COMMAND+P) to switch off presenter notes.

But here is the problem with how Keynote operates: on both the current and next build  screen, nothing can be seen. Keynote will not show the animation, but just as importantly it can’t show what’s not on the slide nor what will happen next – you look at two blank slides, see below. The screen movie of presenter mode shows the current time, the elapsed time, the builds remaining (counting down from 3, 2, 1) and the red and green progress bar at. the screen top edge – when in red, an animation is taking place, when in green, Keynote is ready for the next manual build.

My own vanity app setup to annotate and control slides during a presentation

I have written previously about the software I use to facilitate my own vanity setup on the iPad, called Doceri from SP controls. It uses an app on the MacBook (or Windows setup), and a complementary app on the iPad. With the two devices sharing the same wifi LAN  (I bring my own router but not connected to the internet in the US – at home it does) I can also annotate the slides live, something the latest update to Keynote on the iPad allows for also, if you use the iPad as your presentation hardware.

I should add that I had created the slideshow using Keynote 7, but decided to live dangerously and update to the just released Keynote 8 the day before my presentation. I made a copy of Keynote 7 just in case something broke in 8.

When things don’t go according to plan

I want to point out a couple of issues which raised my level of arousal during my presentation which only I knew about. It may offer you the opportunity to learn from my experience.

My presentation was scheduled to begin very soon after the conference introductory remarks. Previously, when I arrived at the venue I’d gone to the control booth at the back of the auditorium and met with the tech group who checked my sound system, and  wired me up via a back of the head wireless microphone. Because I teach dance, I’m very used to wearing a similar microphone behind the ear.

While I was waiting for my turn to go on stage, I did two things: I quickly ran through all the slides to make sure they were in correct order and no build was hiding behind another, something that can occur when you’re working on slides with multiple builds which cover other builds, where you can forget to build it out, to reveal another image or text.

The second thing I did was fire up the portable wifi router, and open the Doceri apps on the Mac and iPad. This was a small problem as the router expected to see the internet, and had to be told not to keep searching for a connection. At home this happens automatically, but in the US it seeks a 4G tower. A moment of doubt, but it soon did its job.

Once I was ready to go, I headed to the first row, waiting for the signal to head to the podium where the MacBook would be connected via my HMDI adaptor to the A/V system. Once hooked up, I placed it in presenter mode. A different group of tech assistants was there, and as the conference host was finishing his remarks with perhaps 20 seconds for me to take centre stage, I noticed one of the tech crew opening a browser window on my MacBook and accessing YouTube. In doing so, he had dropped me out of my Optus router needed for Doceri, and employed the venue wifi. Asked why this was happening, I was told it was a final sound check, performed by playing a YouTube movie.

I was stunned.

I always keep a blank first slide with a sound file on it for just such purposes, which then transitions to my opening title slide, as shown below – yes, I used a movie background as a way to say, “this isn’t going to be your usual medical Powerpoint.”

slide.gif

I pointed out to the tech people what had happened and quickly reset the wifi to my own wifi router with a few seconds to spare, and the Doceri connection was re-instated. But as I moved to the stage for my introduction, I looked down at my iPad which ought to have been in presenter mode, and it was now in mirror mode. Usually two small screen icons with the numbers 1 and 2 appear above the display, allowing you to begin presenter mode (screen 1, coloured blue, below) or switch to mirror mode (Screen 2, in grey, below) if you want to annotate the slide – annotations won’t work in presenter mode, as shown below.

IMG_2207.PNG

But when I looked closely the choice of modes was not available – I was stuck in mirror mode. A quick glance at the MacBook over on stage right showed it to be in mirror mode, likely a result of the tech support person dropping out of Keynote to open a YouTube browser window.

I was stranded now centre stage, with no hope of taking time to leave the stage and fiddle with the Mac via its screen preferences. I had no way of knowing if the very large audience screen would show the guts of my Keynote (my worst presenter nightmare) or just an empty desktop – a preferred option. But the thought also occurred to me that by trying to setup presenter mode, the audience could possible see what I alone should see, the complete set of slides to come, which for me is a presentation faux pas.

So I had to be content with operating in mirror mode, with the iPad acting solely as a slide advancer. It could work in annotation mode too, but I had prepared my talk so this great feature would not be necessary. Things that would need to be highlighted were already pre-prepared with animations. I had rehearsed and rehearsed and so my not having presenter mode was unfortunate, but not a deal breaker.

What was much more serious is what went missing in mirror mode – my countdown timer which tells me how much time has elapsed (or if you prefer how much time remains), plus the actual Keynote clock time. The iPad does display real time but it’s tiny. I was somewhat panicked when I saw neither Screen 1 or 2 icons were present.

Image-1.jpg

This was very alarming as I need to see the timer. Because I don’t rehearse my exact words like most do for TED-talks, when I rehearse I “play” with the slide narration, testing out various ways to tell my story, knowing the feedback from the audience will guide me. This helps keep the talk spontaneous and lively, not over-rehearsed and “flat”. Some slides I can spend more time with judging by the audience reactions, some can be glossed over swiftly. But I need the timer to keep me on course and finish early if can. If things are going well, I might be able to go to black (use the B key) and add some more to the speech as long as it’s on message – I always rehearse these extras for just such occasions.

Les cedars18

Presenting at Cedar-Sinai Virtual reality in Medicine conference – here, holding my iPad Pro to control and annotate slides. There’s a Samsung 360 degree camera live-streaming, bottom left.

Only after I gave my talk did I learn that just in front of the large vanity monitor were three small lights – green, yellow and red which would flash eventually. These are cue lights to inform presenters of their timing situation. Essentially, I was flying in the dark. When I began my presentation we were already behind schedule and I really wanted to help bring it back, even at the cost of jumping over a slide, but alas I had no idea of the time, and I refuse to look at my wristwatch while presenting.

As if not having presenter mode wasn’t enough…

Once I settled down into a presentation rhythm and felt I had the audience onside, the next glitch occurred. I had quite a few movie clips to show, which I had downloaded from YouTube and converted to .mov format via specialist software. These had all worked on the MacBook in Keynote rehearsal mode, and also while playing on my external LG monitor and Epson projector via HDMI at home. Earlier this year, however, at a conference in Melbourne, two of my movies came up on the screen and refused to play. My initial thought at the time was that I had somehow corrupted the build in-build out timings, but when I got home they played fine on my system.

Lo and Behold the same thing happened to three movies that had worked fine in rehearsal. I tried twice to get them working, and when it was clear they would not, I proceeded to use my storytelling to inform the audience the idea behind the movies. When these situations happen, you just have to keep going, and appear professional – there is no room for thoughts like “I’ve flown 8000 miles to be here – this shouldn’t happen”.

As it turns out,  I received two unexpected compliments during a break after my presentation. One was that I had “read the audience well”, and the other was: “What software did you use?”

I am still working on the movies-not-playing problem, trying to see what properties they have when compared to the movies that did play. This can be achieved using Quicktime’s Movie Inspector window  (COMMAND-I).

Extra features in Keynote 8

It’s always good to know Keynote is receiving updates, although I’m not sure the changes to 7 justified calling the update version 8, rather than a dot release to 7.4. Perhaps it’s to acknowledge the big change in iWork for iOS where the Apple Pencil can be used on inexpensive iPads to annotate slides. New infographics in mobile and desktop iWork apps to build donut charts, integration with Box for sharing content, and a new image gallery feature are the major additions, although I do miss the “Smart Builds” feature left behind in Keynote 5. See an example below, which I like so much I saved as a movie and now use it every so often. It’s actually two minutes in length, but to hopefully not trigger YouTube’s copyright algorithm, I’ve shortened it. Its purpose is to highlight the historical importance of the heart, when I do presentations about the brain. The importance of the heart remains firm in our folklore, so I combined movie posters with snippets of well known songs where the lyrics feature “heart”.

For a fuller description of the Keynote 8 features, see KeynotePro’s website Keynote pro and Keynote 8.


WWDC and the Breathe app for the Applewatch: Apple is only half way there to be really helpful for anxious presenters (and others)

This year’s Apple developers conference began with a generally well-received Keynote featuring its CEO, some well-known SVP presenters, and some new faces.

I choose to use Apple’s Keynote presentation software when I present, and it seems to still be the software Apple relies on for its major presentations.

Keen Keynote users like myself look to these keynotes not just to see the Apple pathway just ahead (major updates to all of its software operating systems) but to see if there are new features in Keynote being demoed, ones we might expect to see in a forthcoming update. This time I saw nothing new, or if there was it was not so glaringly obvious.

But something of interest to presenters did catch my eye. This was an app for the Applewatch called Breathe. It was demoed almost as a “one more thing” at the end of a long presentation about the new operating software for the watch, watchOS 3. The presenter in this case was a first timer, Jay Blahnik, and he comes to Apple with a very interesting fitness pedigree. He is currently Apple’s Director of Fitness and Health Technologies, and was previously strategically involved with Nike.

Jay Blahnik, Apple VP of Fitness and Heath

Apple VP of Fitness and health products, Jay Blahnik

Because of the hiring of Blahnik and Apple CEO Tim Cook’s very strong interest in health, Apple is a company to watch in the digital health domain, as it will certainly use its array of products to challenge medical hardware and software companies with its user friendly products.

Why devote a section of your developer conference to an app called Breathe?

For presenters, I’m sure you’ve either received or been given advice before stepping on stage or behind a podium to “take a couple of deep breaths” to calm or relax you.

Can I tell you: This is lousy advice!

Let me explain, because it’s one of those physiologically-based dogmas that needs to be challenged. I think the Breathe app might come in handy.

Some explain deep breathing as getting more oxygen to the brain. Not quite true. Your body’s cardiovascular system has an excellent system for maintaining oxygen levels without any conscious help from you! Indeed, if you try and override it, you may find yourself getting dizzy or faint or panicky. Not good.

In general, we breathe without awareness about 15 cycles per minute and usually rather shallowly via chest and throat actions. If you go to see a psychologist like me to help you overcome an anxiety issue, such as public speaking, one of the many things we will do (or should do!) is ask about your breathing. I will even hook you up to some biofeedback equipment to measure your breathing rate, or more importantly, your heart rate, so you can see the relationship between the two.

The relationship between breathing and your heart

More than a century ago, it was discovered that certain breathing patterns caused the heart rate to accelerate on the intake, and decelerate as you breathed out.

The pattern of breathing that most accentuated these patterns is known as Diaphragmatic Breathing. Here’s a video from an app I use with patients so you see it in action.

What Diaphragmatic breathing looks like

Great video and writeup of diaphragmatic breathing from Saagara.com

The app I use, one of the first which featured Augmented Reality (AR), is free from Saagara.com Here’s a link to the iTunes (US) store.

Notice if you will the action of the diaphragm which sits under the lungs and separates the thoracic cavity from the gut. It’s a bell shaped annulus of muscle which pulls down and out on the inhale. This creates a partial vacuum in the thorax and air is literally sucked into the lungs. (Similar in some respects to how an aircraft wing generates lift, due to negative pressure on the top surface).

From here, gas exchange can take place much more efficiently and effectively compared to chest or throat breathing. This is one of the important functions of respiration: not just oxygen to circulate, but carbon dioxide, the waste product of oxygenation to escape. As it turns out, in our necks in a place called the brainstem, carbon dioxide is measured (more accurately, carbonic acid) so that the pH of the blood remains constant at a neutral 7.4 or so (For a very detailed scholarly understanding of the chemistry of exercise and breathing see this well illustrated link).

When we exert ourselves so that more oxygen is required for our muscles to do their thing, we setup a whole series of automatic processes, where the intake of oxygen and the removal of waste products of increased metabolism are managed.

How does this affect giving presentations?

When we are about to give a presentation, we can set this exertion process off if we experience large doses of threat sensations, usually due to automatic thoughts, such as “I hope I don’t screw up; I hope the audience likes what I have to show; I hope the technology doesn’t fall over; I can already feel my heart bursting through my chest; my hands are trembling”… and so on…

Sound familiar?

In other words, even standing still, our bodies can interpret our reasoning as a preparation for flight or freeze (fight is a component of the human threat response but is way too much emphasised in pop stress literature, more dogma to take down!)

These are quite automatic responses, yet are accompanied if not augmented with a change in breathing pattern. Flight (or avoidance behaviours ) might see us take short sharp breaths, while freeze may see us hold our breath, a form of apnea you hear about when people snore in their sleep.

While these two breathing patterns can interfere with the oxygen/carbon dioxide ratio, what’s more important for presenters is the loop it encourages in the fearful speaker. This is perhaps where the Breathe watch app might come in handy.

One becomes aware of the effects of the threat system kicking in, then a thought about it forms (“Oh no, here we go again… I hope they don’t see me blushing”) and this thought further sets off the automatic threat response. For some people, it means they can’t enter the stage, for others it may mean freezing in the midst of a really well rehearsed presentation when the next sentence seems stuck and unavailable. This is one reason I don’t memorise presentations – you really can be setting yourself up unless you are a trained actor whose livelihood depends on memorising lines in a play.

So, how does breathing fit into all this, and why the caution about taking deep breaths?

Earlier, I wrote about the brainstem and its role in breathing regulation. Further up the stem into the midbrain is the limbic system, an area which is shared by mammals and is responsible for our emotions, amongst a number of things including the encoding of memory.

It is also a hub for the detection of threats, and connects with many other brain areas to deal with threats, including the aforementioned flight, freeze and fight.

It connects both hormonally and via the nervous centre to those areas of the body that can effect our defences against threat. Our heart can race, we can sweat, we can feel dry in the mouth, we can feel “butterflies” in the stomach, and our thinking can become distorted or thought is unavailable entirely.

And once more, our breathing is all a part of this response. We may freeze and stop breathing so a predatory creature can’t hear or smell us. In some animals, they can go into a state of thanatosis – a faking of death – such that they go rigid and stiff and cold, in the hope that the predator would prefer to make a fresh kill than eat carrion. This is the delicate balance in evolutionary terms between prey and predator.

These “do or die” actions are over with pretty quickly – thirty seconds or a minute. After that you’ve either been overlooked by a predator or you’ve survived long enough for thinking to return and you work out your plan of escape.

If deep breathing achieves a positive outcome, it’s not because more oxygen gets to the brain to “calm” you, but because the slowed breathing pattern it produces is more aligned with focus and attention, rather than flight or freeze. It’s a feedback signal to the threat centres that “all is quiet on the Western Front”, so to speak. To use military terms, “stand down – at ease!”

However, if your breaths are too deep, you will lock your usually flexible diaphragm, and thus send a message to your brain’s emotional centre to confirm the freeze response is the correct one for the present situation. You reinforce unwittingly your fear response.

What I tell my anxious patients is that the threat centre is vigilant for both external cues of danger – a car coming towards you – or internal cues, such as a change of heart rate or blood acidity (due to carbon dioxide build up due to breath changes).

So, what’s the best plan?

So rather than simply do deep breathing, what you want to do is deliberate slow breathing, focussing on the actions of the diaphragm. Research also shows that longer exhales than inhales accentuates the “at ease” phase of dealing with threats.

Up to now, anxiety practitioners like myself have used biofeedback equipment to help measure how heart rate and breathing are related. These can be quite expensive Windows-based software such as ThoughtTechnology (Montreal, Canada) which I have, through to less expensive Mac and PC software/hardware such as the emWave from Heartmath.org in Boulder Creek, California.

The former runs very well on a Macbook Air using Parallels software to emulate Windows, but the software lacks the user interface features I like in the Mac. emWave was Windows based initially but now the Mac software comes on the same CD with its Windows brother and has the same look and feel. Unfortunately, it still utilises Flash for some of its gamification applications which causes me no end of problems.

There are now many apps available on both Android and iPhone OS which can also measure heart rate and guide you through breathing exercises. The US VA has developed a number of them for its returning veterans, and traditionally have developed first for Android, as the hardware is cheaper to buy for Vets still waiting for their compensation packages.

A couple to watch out for are Breathe to Relax (click on the image below to go to the download page):

Breathe2Relax app

The USA Veteran Affairs app, available for iOS and Android

and HeartRate+ which uses either the iPhone’s camera held against your finger tip to measure heart rate, or a bluetooth connection  to a separately purchase heart rate monitor (such as the one in the illustration below).

Heartrate+

HeartRate+ uses your smartphones camera to help detect heart rate

The field of wearable devices which measure heart rate amongst other things is exploding, with the advances in modules which can be included on smartphones and wearables.

What many of these devices have built in is some kind of breathing rate mandala. These are visual cues to help pace breathing in, hold, then breathing out, and hold, and repeat.

Here’s a short video of me hooked up to the emWave for Mac where you can see my heart rate as it changes from moment to moment (the upper graph), my pulse wave (below it), and the breath pacer mandala:

And here’s an image of the Applewatch pacer:

Apple watch Breathe app

Jay Blahnik shows the Breathe app in action

It will be interesting to see if the Heartmath people take an interest in the use of the single colour mandala Apple is using, although it must be said these are quite common symbols especially if purchase fuel for you car:

BP mandala

British Petroleum logo bears a strong resemblance to many breathing app symbols

Interesting side bar:

I visited the HeartMath headquarters up in the Santa Cruz mountains after giving a Macworld workshop in San Francisco a couple of years after the first release of the iPhone, perhaps 2009.

I was there to discuss how better to bring the emWave and its technologies to Australians, and suggested that the iPhone platform opening up to external developers would be an ideal match for the emWave technologies.

Heartmath already had a rather simple but expensive portable device that could sync with its desktop software, and the senior management I spoke with were not interested in developing an app., citing costs. Of course, perhaps one was already in development under an NDA, because a few years later Heartmath released its InnerBalance app (see below) and hardware for the 30pin iPhone and iPad. That has now been upgraded to a lightning connection for the current iOS devices. Moreover, the Heartmath folk incorporated a cloud sharing function, such that a patient could record a breathing trial and give their therapist access to it, for further analysis and feedback in the next session.

Inner Balance app

Heartmath.org Inner Balance app on the iPhone

One of the problems with the Heartmath system is its use of proprietary algorithms to measure a concept known as Coherence, which Heartmath claims to be a measure of balance between sympathetic and parasympathetic arousal.

It does incorporate an international standardised measure of something known as Heart Rate Variability (HRV), but rarely mentions this in its promotional literature. This is why most scholarly studies will use other systems to measure HRV, so measures can be replicated, the hallmark of scientific research.

In late 2014, perhaps aware that Apple’s focus on health and the then rumoured Applewatch rendered its platform threatened, Heartmath entered into an arrangement to license it proprietary algorithms to, of all companies, Samsung, plus one or two others, as shown in its media release, below (click to enlarge):

Capto_Capture 2016-06-17_11-28-33_AM

Heartmath announces the licensing of its proprietary algorithms for Heart Rate Variability

18 months later I’ve not yet seen signs of Samsung employing Heartmath’s technologies. Perhaps the Breathe app will cause some movement for Samsung.

The problem with many of these breathing apps

I want to return to a problem I have with some of these apps, including emWave, and that is that their pacing mandalas are symmetrical… you set the pace in and out and it is the same.

Yet there is now abundant research that there is an optimal breathing rate for each person and that is usually asymmetrical. I couldn’t see in the information so far available for the Breathe app where it can be adjusted but I am heartened by an interview I did see with Jay Blahnik from the UK Daily Mail of June 15, 2016:

Capto_Capture 2016-06-17_11-33-36_AM

Notice the acknowledgement of the longer exhales by Apple, but I don’t see any efforts to help users locate their optimal breathing rate via some external measure. It sets an optimal ratio of in to out (1:1.5) and an optimal breathing rate of 7 cycles per minute.

Let’s contrast that with the HeartRate+ app, which iTunes shows as having a pacer where you can see a yellow ball in the second panel:

Heart Rate Variability

Notice the second and fourth panels where you can set and experiment with breathing patterns

But notice the fourth panel, above. It is here you can set the timing for In, hold, out, hold…

It mimics a free standing Windows-only that’s been put out by the Biofeedback Foundation of Europe (BFE), known as Ez-Air Plus. It is Windows only (yeah, go figure), was free but is now USD19.95. Take a look at it in action on my Macbook Pro running Windows 7 in Parallels:

And if you search for “breath pacer” in the iTunes app store, you will find a number with varying degrees of user configuration, such as this one:

BreathPacer app

An inexpensive iOS app which allows you to configure various breathy pacing parameters

So Apple’s research has concluded that for most users, a breath cycle of 7/min is best. This may be true for the average person, but what about someone who is more challenged, and suffers considerable anxiety which is intrusive and worthy perhaps of a few sessions with a psychologist?

Introducing Respiratory Sinus Arrhythmia (RSA)

In this case, the task is to find out the best breathing pattern which yields the highest possible heart rate variability. To some extent this is trial and error, although a number of the pacing apps will take you through a series of changing patterns over the course of ten or so minutes to see which pattern is best. That pattern has a name, by the way. It is called Respiratory Sinus Arrhythmia (RSA), and represents the influence of respiration to cause a change in the firing of the Sino-Atrial (SA) node in the heart. When this node “fires” it causes the atria of the heart to contract, and the heartbeat cycle commences.

That node begins activating in the developing fetus causing its tiny heart to beat at around day 22 on its own.

Indeed, if you take a diseased heart out of a living person during the course of a heart transplant, it will continue to beat for about half an hour before it ceases:

The main physical link between the heart and the diaphragm is the tenth (X) cranial nerve, the Vagus, an element of the body’s Parasympathetic Nervous system. The Vagus also descends into the viscera (gut), and from the heart heads back into the brain. Some scholars suggest more information returns to the brain (afferent) than goes out (efferent). If you change the activity of one element of the body innervated by the Vagus nerve, the others on the same “train line”, so to speak, are also affected.

The Romans and the Greeks did a lot of the naming of the body’s elements, not so much about function, but about shape, and location. So one element of the threat system which is located in the limbic system is the Amygdala, ancient Greek for almond, due to its shape and size.

The Vagus is so named because, of the twelve cranial nerves named by the Romans, it’s the only one that leaves the head region to travel or wander through the body. Vagus is latin for “to wander”, and so if we say that someone’s conversation is hard to follow or is all over the place, they’re being vague. Sometimes we might say they’re being incoherent, or hard to follow or make a pattern of their speech, and you will see coherence as a measure in some of the HRV apps and devices.

What does this all mean for the anxious presenter?

In my sessions with anxious patients, the task as I see it is to assist them to wind back or recalibrate the threat or alarm system so they may bring focus and attention to the task at hand. This is not to help them “relax” or “feel calm”. Indeed, you can feel highly aroused, heart beating rapidly and deliver an inspired presentation. Just like “take a couple of deep breaths” may not be the best advice, nor is “try and be calm”.

In my work, calmness can be a byproduct or artefact of maximising HRV. Breathing exercises which are slow and deliberate involving the diaphragm cause increased vagal tone which can be measured by even inexpensive heart rate equipment. One asks patients to practise this breathing style on a daily basis, starting with just a few minutes, and perhaps once or twice a week for twenty minutes. Practise when you don’t need the intended effects while you’re still learning about how best to breathe to avoid disappointment. Such as after you send an email, when you come back to work after lunch, etc.

So this kind of app can find utility not just with anxiety, but anybody who needs to up their game, including elite sports people. This is where Apple needs to up its game. Raw heart rate alone is not a good measure of anxiety, although it is a reasonable one for arousal. HRV is much better for assessing vagal tone which can lead to better focus and attention to task. Despite the likely presence of discomforting sensations.

The Applewatch, by being able to measure heart rate, is half way there. All it needs is the open sourced international standards for HRV (PDF) to be applied in a user friendly way (gamification?) for the watch to be truly useful in stress management. As it stands, it’s not there yet, but it’s just a matter of time.

UPDATE – June 23, 2016. Reader Matthew Cassinelli tweeted me that in his use of the watchOS beta, there is an interface where you can dial in the breathing rate.

watchOS Breathe

Apple’s watchOS allows its Breathe app to dial in the breathing rate

This shows that Apple is really thinking about this app and what is needed to individualise it for each user. I’m guessing that in an update there will be a routine by which you can detect which is your best breathing rate not just for comfort, but because it maximises your HRV. Perhaps it will allow you to start 10 breaths per minute, for a minute, then move each minute through one less cycle per minute, ie., 10…9…8… etc. and then give you feedback as to your optimum rate.

Feedback is so important to presenters shifting the paradigm – overcoming Powerpointlessness

This entry is going to sound a little self-aggrandising -perhaps even full of braggadocio  – but the exchange between myself and an attendee following a recent academic presentation I gave may be useful if you attend similar workshops.

A few weeks ago, I was the final speaker in a long day on a rather dry but important subject for psychologists – risk management. I was requested to speak about how IT could mitigate  risk for psychologist practitioners. I’ve offered all day workshops for this population around Australia, showing how IT can be incorporated into their workflow.

So, I attended with a presentation I believe understood its audience’s fears and concerns, which would only have been heightened through the day with lectures by lawyers, “old heads” and representations from regulatory boards.

I saw my task, being the last speaker for the day, as being both “light” and enlightening, and indeed very early in my presentation, acknowledged that I was presenting in one of the two times to be avoided: last (the other being straight after lunch).

I asked the audience to relax, forget about taking notes, while I told them a story. Yes, I literally said I was going to tell them a story. Which I proceeded to do about an airline’s incident which saw a 747 land with its nose gear retracted at Sydney Airport in 1994. I then wove a story within a story about how I was already involved as a psychologist with the same airline, and how I came to be involved in the aftermath of the incident in question.

Quite a few in the audience of perhaps 150 looked confused as to where I was going and its relevance to the day’s topic, but it soon came home to them, which is a frequent modus operandi I have when presenting. It’s a fine line, but hanging people out in confusion then bringing them back in with an “aha – I get it” moment is a trope I use for increasing audience engagement, much like a magician tries to hold an audience in suspense while setting up the trick.

This was the first time I’d presented this topic in this short format (about 45″) and so without an opportunity to trial it, I was eager to receive some feedback. A few days later, I received an email whose author has given me permission to reproduce (without ID). I was a little surprised by its content and focus:

Hi Les,
I attended your presentation last weekend at the PPWP meeting.
Thanks for presenting such an engaging and thought provoking presentation – especially, as you acknowledged, in the graveyard shift!
While I was very interested in the content of your presentation I have to admit to being more focussed on process, and taking copious notes about presentation style and the use of a/v.
I speak regularly in both Psychology and Yoga settings (I am a Psych and also a Yoga Teacher), and I’m presenting a keynote presentation this March at the Yoga Australia national conference (the peak body for Yoga Teachers in Australia).
I’ve been gradually training myself away from a heavy reliance on text based presentations, and I’m really hoping to challenge myself with this presentation.
So – to get to the point – I’m really keen to attend one of your ‘Presentation Magic’ courses if you still run them?  And I also wondered if you offer individual consultation where you could look over my planned presentation and provide feedback?
Thanks Les, cheerio,
To provide some context, not just was my presentation the last for the day, but the previous ones had followed the usual psychology Powerpoint style which the letter above alludes to. It wasn’t just that being the final speaker is a tough task, but expectations after a day of text-based powerpoint is usually so low that my task was actually made a little easier in terms of gaining attention and engagement. Just by daring to be different.
I opened a dialogue with my correspondent:
Thanks for your feedback,

Had you seen me present before?

If you hadn’t, I can imagine that what you witnessed (“saw” is too narrow) may have changed or confirmed the direction you want to take your own presentations.

Certainly (and I only got there after lunch), you would have witnessed standard psychology presentation materials and skills during the day.

I’d be really curious – as in, I would like to write a blog article – about your “copious notes”: what was occurring to you as you were note-taking, as I’m guessing that’s not what you had come prepared to do, but correct me if I’m wrong.
It’s not everyday you get to have such feedback. Often we present in an unfamiliar location to an audience we may never see again. Given this, I was curious to hear the feedback, which shortly arrived in the form of points the correspondent had taken while I presented:

Les’s presentation approach:

  • ·             Handheld device to control powerpoint
  • ·             ‘Holder’ under iPad mini to handle easily
  • ·             Les had his own notes on the mini?
  • ·             Storytelling – to make a point. Use visual prompts to help tell the story
  •               Engage the audience – don’t treat them like they have no idea what              you’re talking about, ie. Don’t tell them the obvious!
  • ·             Weave different things throughout – ie, while Les was talking abut the plane crash he mentioned his own work in fear of flying
  • ·             Slides are purely, very few words
  • ·             Keep to a few key messages – eg. Les’s 3, 2, 1
  • ·             Offer something people can email you for (eg, Les’s social medial policy). This encourages follow up and interaction with your audience later
  • ·             Tell people what you are and aren’t going to cover – keep expectations manageable
  • ·             When referencing websites use screenshot images of the website – visual interest
  • ·             Books – show image of the cover of the book
  • ·             Give the audience time to think for themselves – pose questions for their deliberation

I found this very interesting – what a psychologist about to do her own important keynote in a few weeks – finds worth attending to in another’s presentation. It’s important feedback. Let me share the next piece of correspondence (my response) which will hopefully provide further clarification:

I am curious when you noticed your attention shifted from content to process – do you recall? After all, you were most likely lulled into a sense of Powerpointlessness by some of the previous speakers – or did you recall you’d seen me before and so your expectations shifted? Just asking so as to provide for more depth and nuance to my blog article!

Let me go through your observations one by one:

Les’s presentation approach:

  • ·             Handheld device to control powerpoint

Yes, I use my iPad nowadays, rather than stand at the podium and click the keyboard. It requires the MacbookAir and the iPad to be on the same wifi network. I use my Optus mobile wifi router to provide that. It also accesses the web in case I need to do that to answer a question. But I also keep a small handheld Kensington clicker USB installed in case Optus falls over. (backup!) Oh, and I don’t use Powerpoint!

  • ·             ‘Holder’ under iPad mini to handle easily

This was a device (“BakBone”) gifted to me a few years ago when I was a Keynote speaker at Macworld in San Francisco, part of the shwag for presenters. It was developed by a surgeon to help hold his iPad in surgery! Link: <http://www.holdyourtablet.com/pages/about-the-bakbone-tablet-holder>

  • ·             Les had his own notes on the mini?

No, no notes under the slides. Anything that is important enough to need a note (an amount, a number of significance, a ratio), should be on the slide itself. I tell stories (see below) and so the slides (I can see the next one coming on the iPad) cue me in. But you must know your story. The exact words are not so important, so you don’t need to learn lines like an actor. BUT, it does require rehearsal which includes advancing your slides to match your words. We can discuss this more. If I made it look easy, it’s because I practise so much.

  • ·             Storytelling – to make a point. Use visual prompts to help tell the story

As above.

  • ·             Engage the audience – don’t treat them like they have no idea what you’re talking about, ie. Don’t tell them the obvious!

I call it “respect your audience”. They may not have the deep understanding of the subject, but they will appreciate being treated as equals. Lowers the barrier to engagement.

  • ·             Weave different things throughout – ie, while Les was talking abut the plane crash he mentioned his own work in fear of flying

Unspoken presentation rule. Even engaging presos need a change of pace and media every few minutes.

  • ·             Slides are purely, very few words

Yep. Slides are your support crew. Martin/Lewis; Abbott/Costello; Rowan/Martin… etc. You work as a team.

  • ·             Keep to a few key messages – eg. Les’s 3, 2, 1

in a brief presentation like mine, no more than 2 main messages for the audience – and tell them, “this is one of your take-home  messages you can start working on immediately”.

  • ·             Offer something people can email you for (eg, Les’s social medial policy). This encourages follow up and interaction with your audience later

Sneaky, aren’t I? Social psychology is plastered with experimental findings like this.

  • ·             Tell people what you are and aren’t going to cover – keep expectations manageable

Not sure I actually did this, apart from the low expectations which gets a quick laugh, but underneath that sets the tone,  also the quality of the presentation. Many in the audience who ARE presenters and think they know Powerpoint, will ask themselves, “How did he DO that?” Curiosity – up!

  • ·             When referencing websites use screenshot images of the website – visual interest

Absolutely, And the same for books and journal articles and emails… And then focus in on the salient bits and it’s OK to read someone else’s quote, just not your own!

  • ·             Books – show image of the cover of the book

ditto!

  • ·             Give the audience time to think for themselves – pose questions for their deliberation

Yes, all about engagement, and lots of small “aha” moments. Misdirect, then bring the audience home, so they sigh with satisfaction: “Yep, I get that… cool!”

Hope this helps

I want to share with you the final correspondence of relevance:

Thanks Les for your detailed points (above) – incredibly helpful and very generous of you.

My attention was on process before you spoke as I know presentation skills are your forte, and I’m working on this myself.  Yes, I had already been ‘lulled into a sense of Powerpointlessness’… please use that in your blog – gold!
I really loved that for a while there I was thinking – “where is he going with this story?  I’m not sure it’s relevant”… then a-ha!
The message I want to convey in this blog entry is that many in academia and the regulated health professions are ready for change in how complex ideas and information is offered up in formal settings designed to improve their professional development. The standard way of powerpoint-based learning is no longer working for many and no longer can be considered evidence based teaching, yet we still persist with it as evidence of the persistence of social norms and tradition in the sciences.
Thankfully, there will be a growing number of practitioner who both recognise quality training, and who are willing to say enough is enough to their peers and professional societies.

A Keynote tutorial showing an advanced use of MagicMove to animate a still photo

Microsoft has finally acknowledged how poorly the vast majority of its Powerpoint users apply their technology. Too much text, and chintzy clip art.

In Office365 its Office team has introduced two “new” features called Designer and Morph.

Here is an official video from one of its engineering team, Christopher Maloney.

Apple Keynote users are likely to shrug their shoulders knowing that Keynote has had such design aspirations almost from its beginnings in 2003, and the Morph equivalent, MagicMove, was introduced by Phil Schiller at Macworld in January 2009. (Steve Jobs had stopped keynoting the year before, when he introduced the original MacbookAir).

Since then, many Keynote users have adopted MagicMove into their workflow, although many of us have always thought Apple could do so much more with it.

Perhaps it will now that Microsoft has caught the bug of more evolved animation, but if MagicMove does up the ante, it will likely be because the desire for iOS parity has been achieved with more powerful A-series processors and more RAM in Apple’s mobile devices.

The bleating that accompanied the shift from Keynote 5 to Keynote 6 a few years ago, when quite a few special elements of Keynote were omitted, has quietened. More features have been returned or added to Keynote, and at least there appears to be life in the iWork engineering team with more frequent updates in recent months.

I am a big user of MagicMove, because it saves time, mouse clicks and “build clutter”. When a single slide has so many builds, it’s hard to decipher what one has created. This is not helped by the Keynote team who have not updated the layering of elements in the way Microsoft achieved it years ago, as shown in the video I created below, in 2011!

The other problem with its build order is the inability to name groups after one has combined elements. All groups are simply labelled group, rather than an even minimally useful: Group 1, Group 2, etc. Perhaps that is still to come.

It seems clear to me though that Keynote users are some of the most creative people out there, taking what the engineering team offers, then re-purposing it in novel ways which perhaps surprise and delight the team. That was certainly the experience I enjoyed when I visited the team in Pittsburgh in 2009.

So I want to take you through another tutorial on using Keynote’s MagicMove to create some popular designer memes you’ll see in videos and current affairs television, where the graphic artists have employed very expensive pro software.

I get better with Keynote when I’m inspired by the pros and try to emulate what they do as much as possible in Keynote, and only when necessary step outside and use inexpensive third party software.

Here is an example of a meme I will attempt to emulate in Keynote. What you’ll see below is a pro-user’s After Effects tutorial using a parallax effect to create movement on a still photo. The effect is seen in the first minute or so and the rest of the video is the “How to” part:

Clearly, for some presentations you’ll need to leave Keynote to use either After Effects from Adobe, or Apple’s own Motion. Each has quite a steep learning curve if you’re used to the simplicity of Keynote. The resultant movie will then be imported into your presentation.

But Keynote still has some tricks up its sleeve. In the video tutorial below, I step you through how to bring movement to a static photo, like the After Effects illustration above.

It uses Keynote’s MagicMove, Draw with pen, and Mask with selection elements, and also utilises a third party software from MacPhun called Snapheal Pro. As always your comments are valued, especially if you have other workflows to share.


An Apple Keynote two-part tutorial showing how to create more engaging stories using “Draw with Pen” and the “Line Draw” build

Continuing my series of tutorials to help beginners to Apple’s Keynote presentation software, in this blog entry I am going to show you some examples of using the Line Draw build together with the “Draw with Pen” shape selector.

Using these two elements can allow you to illustrate an idea demonstrating change over time, as if you are drawing a free hand line with multiple curved elements. The idea is to replicate in Keynote the diagram, below, which I used for a workshop on introducing new IT for psychologists and the challenges altering one’s workflow can bring.

From Alex Miller's Pure Danger Tech website http://tech.puredanger.com/2009/01/28/maven-adoption-curve/

From Alex Miller’s Pure Danger Tech website
http://tech.puredanger.com/2009/01/28/maven-adoption-curve/

I have divided the tutorial into two videos. The first is how to create the line from scratch within Keynote, below. The second is a tutorial using the same animated line, but this time stopping it along its path, allowing the presenter to interact with the audience before moving to the next element and repeating the process, all within Keynote.

Using the diagram, above, this will happen three times.

Video tutorial 1: Creating the line using “Draw with Pen” and the Line Draw build.

Video tutorial 2: Stopping the Line Draw build at three locations to emphasise ideas for the audience.

There are numerous ways to achieve the same effect. Drop in comment to share an alternative idea.

A Keynote presentation skills video tutorial on using hyperlinks – how to move beyond linear slide shows to something more interactive.

One of the problems with current slideware tools like Keynote and Powerpoint is their encouragement of linear presenting styles.

You start at Slide 1, and finish at Slide N, wherever that may be. You might decide to skip over some slides if time is running out, or your judge your audience can safely ignore Slides 5,7 and 10, for example.

Such linear presenting is very worthwhile for brief and to the point sessions.

But if you are running an all day workshop, or you’d prefer to be much more flexible in your content delivery, and invite your audience to participate in the proceedings, then you’ll need to learn about Hyperlinks.

In the video tutorial aimed more at beginners (but advanced users will enjoy too), I take you through some user cases for hyperlinking, and then show you how to create them.

Please share with your friends, and use the Comments section to provide feedback and suggestions for further video tutorials

A Keynote “How To” for beginner users: designing a slide using a quote to attract attention

Continuing my work on bringing Keynote features to readers, in the video below aimed more at beginners to Keynote, I show how to design a slide for high intensity quotations. This is a meme that’s getting around professional TV shows and their twitter feeds, and for a beginner transiting from Powerpoint, the tutorial highlights some of the basic mechanics of the Keynote user interface. The aim is to produce an engaging slide like the one below which contains a number of elements.

A design meme I'll reproduce in a "how to" in Keynote

A design meme I’ll reproduce in a “how to” in Keynote

Notice the elements:

  1. A large, full screen very sharp image.
  2. A portion of the screen is set to the left, fuzzed.
  3. On which bold sans serif text is laid, the quoatation
  4. The authors’s name in a smaller weight, but leaving the viewer no doubt the connection between author and quote

And now, here’s the video which you can follow to recreate this kind of image on your own slide. At the very end, I’ll demo a more advanced technique for users who have gained experience using move and wipe builds.

More “How to” adventures with Keynote’s Line Draw build to add spice to your presentations.

Following on from my previous illustration of Keynote’s new Line Draw build, here’s a demo of some more uses for it and how to use either arrows or free pen drawing to illustrate an idea about something that might “spread”. In this case, railways across the US.

I was inspired by a documentary movie about the American Mustang horse, and wanted to see if I could emulate the effects used to demonstrate the horses’ spread across the continental US. This is one way I keep myself fresh with ideas for Keynote, and try to push its limits before resorting to a more expensive harder-to-use option. These options, like Motion, can be great for making webinars, but I like the flexibility Keynote gives me for my live presentations.

Once more, I’ve tried to show the effect and how it’s done in a way that allows you to follow along with your own Keynote file.

Steve Jobs’ Keynote work ethic, and Keynote 6.6’s new build, “Line Draw” – learn what it does

In a timely post last week, pre-dating the release of significant updates to Apple’s iWork suite, former Apple VP Jean-Louis Gassee offered up a “Monday notes” blog entry mentioning his work with Steve Jobs, and in particular, Jobs’ use of Keynote, his presentation software first brought to market in 2003 (click to enlarge):

Jean-Louis Gassee's blog quoting Phil Schiller on Steve Jobs keynote preparation

Jean-Louis Gassee’s blog quoting Phil Schiller on Steve Jobs keynote preparation

This really echoes my own thoughts about Keynote, and presenting, and I still believe Apple’s competitor to Microsoft’s Powerpoint elicits within me a flow of ideas and concepts which its competitors can’t – just trying to manage their layout and mechanics interferes with my creativity. Others may feel other software best helps them with their thinking through of ideas.

I must say that for many people the thought of putting Jobsian efforts into their presentations feels very unnatural, especially those time-poor, such as teachers. You’ll note too how the description speaks of Jobs’ ever-present awareness of how best to convey an idea to a particular audience. Indeed, in Walter Isaacson’s biography, there’s a story of Steve Jobs being in hospital for treatment scolding his treating doctors for their poor presentations, and offering to coach them in Keynote. Jobs clearly believed that providing presenters with better tools might assist them with better presentations . I’m guessing he would not brook the argument that it’s not correct to blame the tool, but the carpenter for a poor job. For me, a poorly balanced and blunt saw will interfere with an accomplished carpenter’s efforts. Similarly, even the most expensive and exquisite Stradivarius will not make a mediocre violinist anything more than mediocre.

During the same week that followed, Apple made some major changes to its iWork suite, even though it named these as just point changes. It took the cloud based offerings out of beta, added new features, and improved iWork apps’ abilities to open old files created from previous versions. For Keynote 6.6, here are the published changes from the Keynote Help file:

New features in Keynote 6.6

New features in Keynote 6.6

In this blog post, I want to focus on and illustrate the new build animation, Line Draw.

I have previously used existing Keynote elements to achieve the same animation, but it has been complex and inelegant. Line Draw is simple: it refers to drawing a line with an arrowhead or other endpoint and having it appear right at the beginning, rather than at the end, which occurs if you use a Wipe build-in.

There is a little more to it, and so I have created a kind of “How to” Youtube video for you to study, and incorporate some other ideas for animating charts. I’d estimate it as requiring moderate Keynote skills and knowledge. Stop the video where you need to, but certainly try to emulate what I’m doing to best learn.

Here’s the video – watch it full screen:

Essential new tools for bringing presentations, using Keynote or Powerpoint, to a whole other level

Last week, I spend time on Australia’s Gold Coast in Southern Queensland attending my professional society’s Annual Conference. This year, it celebrated 50 years and I was fortunate to be asked to be a member of the Organising Committee. I also gave a pre-conference half-day workshop on Presentation Skills, as well as being a panellist for a Social Media symposium, and chairing two symposia on technologies and animal-assistive therapy.

The Presentation Skills workshop gave me the opportunity to do the “walk and the talk” to about 25 attendees, the maximum the room could accommodate comfortably.

Interestingly, the room was in a very modern Convention facility, decked out with the latest technology whistles and bells. This included screens next to each room which could be updated with information about sessions. I had informed the AV people I would be using my own MacbookAir, and I would bring up my own adaptors.

Usually, I visit a new venue the day before to check out its layout and AV facilities so I am ready to go when the first attendee walks in. On this occasion, I landed the night before, so my first chance to see the room was an hour before the scheduled commencement.

The setup for other presenters was the usual configuration now commonly found in conventions to minimise problems: you go to a “blue room” where the AV people have some networked PCs and you offer them your Powerpoint on a memory stick. They upload it to their server, and add in your name to the first slide of the symposium which lists all the presenters with names hyperlinked. That way, the session chair just clicks on the next speaker’s name, and their Powerpoint opens.

The system on the Gold Coast unusually allowed for presenter mode, such that the standard PC on the lectern could  display both the current slide and the next one, something I find incredibly useful but few others seem to use.

In this system there was no way to accomodate a Mac running Apple’s Keynote.  Which is why I let AV people know ahead of time of my particular needs. However, in my workshop room, there was a wireless USB device which allowed the Mac to be seen by the projector, but only in mirror mode, disallowing presenter mode. This wasn’t satisfactory as I am set to work in presenter mode, and I wanted to show it as part of the discussion on how to improve presenting styles.

So it was back to plan A, which was to connect the Macbook Air via an adaptor to the projection system. This proved difficult as the system wanted an HDMI adaptor, and I had brought only the usual VGA adaptor. My Bad. It now becomes standard practice when visiting a new venue to bring both, as well as an AppleTV if I want to display attendees’ laptop displays (if they have a Mac) or their iPad’s or iPhone’s. Using HDMI also means audio can be passed through as well, rather than a separate cable (which sometimes is tied down and will not stretch to the Macbook. You put your Mac where the AV team says to put it!)

On this occasion, I didn’t hook in my AppleTV, so if I was going to display attendees’ screens, another solution would be needed. For a laptop, that would mean the wireless USB dongle mentioned above; for an iOS device, they would link wirelessly to my MacbookAir using my own wifi router and software from Squirrels called Reflector. The latest version is compatible with Android and Windows devices.

If an AppleTV was connected, it would use Airplay to mirror all Apple devices. I am finding this kind of setup in lecture rooms and modern convention centres to be on the increase. The only struggle can be making sure all devices connecting wirelessly are on the same subnet mask and you know any passwords for Airplay. This is why I bring my own router, but you can also bring and connect an Airport Express which will help connect 50 devices on the same subnet, as long as it can be put in bridging mode or connected to the available network over Ethernet. If it sounds like the “just give us your plain and simple Powerpoint file” is simpler and less trouble, you’d be correct.

In days of yore, of course, this was all unnecessary, as you rocked up to your presentation with your carousel of 35mm slides, and there was no sharing of others’ work. Your transition to the next slide was audibly heard with a definitive “chunck-chunck” sound, when the slides were advanced. So in those days, transitions were audible, not visual. Occasionally, a slide would be upside down or back to front, or even get caught in the gate and melt!

I started my workshop with a couple of slides using movies and effects simply not possible with either 35mm slides, overhead transparencies, or indeed likely never seen by this audience: this is my shaking book slide which I have written about previously. Here it is again:

This is my way of sending a direct message in the first few moments of the workshop that we are doing something different today.

But I also have two other means of demonstrating this “different way” of presenting which commences even before the first slide is shown.

In an effort to impress the group we will be doing a “presentation as conversation”, I refuse to stand behind a lectern and instead stand to the left of the screen if this is possible, with the MacBook Air over on the right side near the mixing panel and connections. Thus, if the audience looks to the front of the room, they see me on the left, the screen in the middle, and ancillary equipment to the right. The task is to remain in charge of the presentation even though the screen dominates the room, and the audience expects the screen to be the main medium by which they will learn. They will soon learn however that physical layout is only a small part of their learning experience.

The second clue that something different is happening comes when the audience notices I am holding my iPad in my left hand, and I might have a small Kensington clicker in my right. It’s the iPad which will control the flow of slides with the clicker as backup. (The second backup is walking up to the MacBook and hitting one of the keys which advances the slides manually).

There was a time when I travelled to present and would place the iPad in a stand in front of me to operate as a vanity or “confidence” monitor. Most modern keynote arenas will have these on display on the floor and if you’ve watched Apple’s own keynotes or those from TED talks, you’re also likely to have seen them in action, such as here:

Steve Jobs delivering a keynote and his confidence monitors below stage in presenter mode

Steve Jobs delivering a keynote and his confidence monitors below stage in presenter mode

Voila_Capture2015-10-07_12-16-58_PM

Above is Facebook COO, Sheryl Sandberg, in a TED talk and her confidence monitors.

These are great if you’re unlikely to move around very much. In the case of Steve Jobs and the huge stages he once worked, several pairs of monitors were strategically placed along the foot of the stage so no matter if he was extreme stage left or right he could see the monitors. His slide stacks often contained hundreds of slides and builds, too many to memorise so confidence monitors ion presenter display are needed to keep the story on track.

In a small workshop room where space is premium and where the stand with an attached iPad could obscure the screen for some at the back, another option is needed.

And this is where my three favourite presentation augmenters come into the picture, apart from the MacbookAir and Keynote itself.

They are:

  1. An iPadAir
  2. Doceri software, installed on both iPad and Macbook
  3. Bakbone magnetic holder, attached to the iPad.

There was a time when I wanted both hands free when I presented, with my right hand surreptitiously holding the Kensington clicker so that slides or builds would advance as if by magic in concordance with what I was saying. After the first few times, I think audiences stopped trying to work out how it happened and just accepted and perhaps expected the style throughout the rest of the presentation.

This is now one of the important evidence-based rules of presenting such that audio (what I’m saying) and video (what the audience is seeing) are in sync. The two most important sensory channels (auditory and visual) work together, rather than splitting; splitting or mixing up the channels confuses an audience at a “less than conscious level” and if you keep doing it in your presentation, they will attempt to restore the balance by doing their own activities and ignoring you. That is, they will reach for their iPhone or speak with their colleague next to them.

Having “split channels” is one of the ways many presenters unwittingly disengage their audience; it is easily “cured” and will lead to improved engagement and message delivery and recall. It is an essential skill presenters need to learn, and then impose upon their slide conception and building. By example, once I have a basic draft of my slide or set of slides, I will rehearse what I will say and practice my timing of slide builds. If it seems awkward or much too fiddly, I will try to automate the builds so they flow together rather than me having to remember when to click to advance. With really complicated slides with lots of automatic builds at precise intervals, I may even export that slide as a movie and then bring the movie back onto a slide, and let it roll. But that requires a great deal of rehearsal to hit your “marks” accurately. The “shaking book” example I began with started out as a complex slide, but it now a single movie replacing perhaps 25 builds.

Recording a complex set of single slide builds also helps with those times when the presenter clicker decides to stop working, or some background operation on the Mac decides to kick in (e.g. Spotlight, or when you’ve forgotten to shut down Mail and it’s automatically connecting to the Mail server). This is when you might double click because the first click didn’t advance – except it did, but was delayed and now that beautiful point you were making has been skipped because you double clicked!

If you export the slide builds as a movie in HD, your audience will not see any loss of picture quality, and it adds a safety net to your presentation. Mind you, it can also bulk up a slide stack, so don’t go overboard either!

So nowadays I hold the iPad in my left hand rather than have it attached to an immobile stand. It’s almost like returning to the bad old days of having 3×5 cards on which you have written your main points. These were yesterday’s presenter screens, cueing you in to the next element of your story, rather than reading the notes on the slides (egregious presenter error of the highest order, except if you are expressing a quotation from a nominated source).

Initially, I was worried that I may be harshly judged if the audience saw me refer to the iPad in my hand. Previously, my use of a vanity monitor would be done as surreptitiously as using the clicker, so as not to allow the audience to see me clueing myself in. You’ll often see the Apple V-P’s glancing down at their vanity monitors during their keynotes in quite obvious fashion, certainly much more so than Steve Jobs ever did. It’s neither good nor bad, just what it is.

But now, carrying the iPad with me, roving about the room, it’s very obvious what I’m doing but I no longer concern myself that the audience is “in” on my presentation tricks. Indeed, many come up to me afterwards and ask about the arrangement I use, principally because they would like to emulate its obvious effectiveness.

This is because the software I use on my iPad allows me to mirror the Macbook’s display in presenter mode, or, mirror what the data projector is displaying to the audience. The former is important for me as I may have roamed the room and now can’t see the Macbook to cue myself into the next slide or build. The iPad mirrors the Macbook’s Keynote (or Powerpoint) in presenter mode, and lets me see current and next slide using some wonderful software called Doceri.

I’ve blogged about the Doceri software before, and it’s recently received a small update to make it compatible with iOS9. It’s from SP Controls in South San Francisco, and I continue to be a beta tester and feed back ideas for product improvement. The software has very much found a home in teaching environments such as schools and colleges, and less so in presentation arenas, not surprising given how uncomfortable with change many presenters can be.

But the other reason audiences accommodate this rather strange or unfamiliar approach to presenting comes via Doceri’s ability for me to annotate the current slide on show. When in mirror mode (the iPad is displaying what the audience is seeing), I can draw, underline, bring up other pictures to colour in, take a picture of the audience, and leap about other slides which I have stored in Doceri but not prepared for the current presentation. Should it be necessary, I can keep the current presentation going, and overlay a previous set of slide pictures should an unanticipated question or comment occur. I think we’ve all had those moments when there is that one really great slide which could illustrate a point an audience member has just raised, but it’s not in the current stack. And Doceri will also record what I’m doing for uploading to YouTube if that’s my desire.

A more primitive form of this is possible if you use your iPhone as your “clicker” such that it can also go into presenter display mode, and supply you with a laser pointer-like image you can move around the display screen by dragging on your iPhone screen. And some minimal annotation tools too, all hand drawn. Doceri lets you draw precise squares, circles and objects with its palette of tools. There is one caveat however: if you’re in single screen drawing mode, the slides won’t advance. You have to unlock and leave that mode, even when mirroring. Doceri has the option of placing a thin coloured rectangle around the slide to cue you in that it is still in drawing mode, something most viewers will not see because they’re not expecting to see it – a form of inattentional blindness.

I’ve seen presenters use their iPhone as a clicker/vanity screen but the small size of the screen, even in Plus versions, has never had much appeal. It feels ungainly to hold and manipulate.

Which is your cue to ask about holding a 9.7 inch iPad and its ungainliness. And this is where the Bakbone comes into play. Let’s show you the video so you get to see what it is:

Rather than having the Bakbone attached in the middle of the iPad’s back panel over the  logo, I have it set to one side so I can more easily reach the Home button.

Its use means I don’t have to put too much thought or energy into holding onto the iPad – it just sits on my finger. I have to tell you that after workshops nowadays, I get two questions asked more often than others: One is what software I used (especially in workshops where I am not referring to Keynote or Powerpoint), and the second is about the Bakbone, especially from teachers who are employing iPads in their classroom for whom the Bakbone is clearly going to solve some problems.

I was given a Bakbone a few years ago as part of the shwag for presenting at Macworld, and it has become an indispensable part of my presenting, freeing me up from the static use of the iPad as vanity monitor, and allowing me to be much more interactive with the slides I’ve created, facilitated by Doceri’s vast compliment of presenting tools. It is now distributed in Australia via this link

One of the Bakbone inventors, physician Paul Webber

One of the Bakbone inventors, physician Paul Webber

In the next month or so when the iPad Pro with its pencil ships, it will be interesting to see if Doceri updates to take advantage of all that extra real estate and if the Bakbone will be compatible given the iPad Pro’s extra size. I’m guessing the Bakbone crew are constructing mockups given we know dimensions and weight, to see if there are handling issues. With current tablets, the use of factory styli are said to be compromised so it will be of great interest to see if the iPad Pencil will work.

I want to conclude this entry with a fresh point I made in my workshop to psychologists last week. I took them through a visual history of presenting so as to inform them that the problem of getting information from one person into another is a very ancient human challenge. From lectures, through to drawing in the sand and on slate, through to overhead cells and now slideware, it’s a challenge to know what the evidence says is most effective and which is being held onto for reasons of social norms and tradition.

To which I offered: “If you could have done your presentation using overheads like we did in the 1960s and 1970s and even into the 1980s (the reason in fact that Powerpoint came into existence – to help the MacPlus construct cell transparencies using new LaserWriters), then did you do your audience any favours? Did you produce for your audience a modern means of learning compared to something whose origins began in WWII for military training?”

And there was one last thing I offered in this pre-conference workshop:

“You’re gonna hate me, because for the next three days of this conference, going to various symposia and keynotes from eminent scientists, you won’t be able to unsee all the presentation errors I’ve just shown you. You’ll giggle, or gasp while your colleagues are trying to concentrate on the message; but you’ll feel split because once seen, the errors can’t be unseen. Just think of it as my workshop going on for another few days!”